
Welcome to the official v38armageddon's Docs!
Here you can find all the documentations for any projects made by v38armageddon.

Presentation
Welcome to the Vincent OS Documentation, you can find several information about Vincent OS and its different features.
Vincent OS is a Operating System based on Arch, it was created by v38armageddon.
The principal features are:
- Unique desktop layout with KDE.
- Dedicated repository.
- PowerShell by default.
- Windows compatibility with Wine.
- Core LivePatch, a hotpatch manager to apply critical updates without rebooting.
- ClamAV integration for enhanced security.
linux-zenas the default kernel for improved performance.
You can find in this documentation all the information you need to get started with Vincent OS and technical details about its features.
For any questions or feedback, you can reach out the Community on the Vincent OS Forum.
System Requirements
Vincent OS requires the following minimum system specifications for installation:
If you have a system that does not meet these requirements but can run Vincent OS smoothly, do not hesitate to report your experience on our forum.
| Component | Minimum | Recommended |
|---|---|---|
| CPU | AMD Athlon 3000G | Intel Core i5-1135G7 |
| RAM | 4 GB | 8 GB |
| Storage | 20 GB | 50 GB |
Download the ISO
The Vincent OS ISO can be downloaded from the official website via Internet Archive.
In this page you can find all releases versions of Vincent OS as well as their states.
A stable release of Vincent OS is supported for approximately 10 years, divided into two 5-year periods:
- First 5 years: Full support, including updates and security patches.
- Following 5 years: Extended (limited) support, which provides only basic maintenance, encouraging users to upgrade to newer versions.
For specific versions support (Open Beta), the support timeline may differ. Please refer to the announcement forum for more informations.
Supported versions
| Edition | Version | Architecture | Release Date |
|---|---|---|---|
| Vincent OS Standard | 1.1 | x86_64 | 2025-11-22 |
Upcoming versions
| Edition | Version | Architecture |
|---|
Discontinued versions
| Edition | Version | Architecture | Release Date | End of Life |
|---|---|---|---|---|
| Vincent OS Standard | 1.0 Open Beta | x86_64 | 2025-07-05 | 2026-04-04 |
Versioning scheme
Vincent OS use the following versioning scheme: MAJOR.minor
MAJOR: Significant changes, new features, or major improvements. These releases introduce new functionalities and support the normal Vincent OS lifecycle.minor: Minor updates, bug fixes, and security patches. These releases focus on maintaining stability and addressing issues without introducing significant changes.
When a new minor version is released, it will replace the previous minor version within the same MAJOR version. For example, if version 1.0 is released and later updated to 1.1, the 1.1 version will supersede 1.0.
All releases notes can be found on the announcement forum.
Flash the ISO
Classic Method
After downloading the ISO, you need:
- A external device for the ISO
- Rufus (if you are on Windows)
- Enough storage space for Vincent OS
- Backup all your personal data in a external device and/or a cloud!
Make sure the Secure Boot of your computer is disabled, otherwise, Vincent OS won't boot.
Check the manual page of your motherboard how to disable.
If you are on Windows:
Download Rufus and launch from your system, chose the peripheral of your external device and select the Vincent OS ISO by clicking on the button: SELECTION, after, click on: START. Select the ISO method and wait.
If you are on Linux:
You can use GNOME Disk for flashing the ISO in your external device. It's the safest and recommended method if you don't want be risky. On GNOME Disk, select your device, click on hamburger button and select: Restore disk image. Select the Vincent OS ISO and wait (you need to enter your password before GNOME Disk start).
After flashing your device, reboot your computer and boot on the device. Check the manual on your motherboard how to change the boot order.
Ventoy Method
You can drag and drop the Vincent OS ISO into your Ventoy USB Stick, make sure you have the latest version of Ventoy to avoid problems.
Installation
The installation of Vincent OS is a simple process that can be completed in a few steps. Follow the instructions below to get started:
Step 1: Prepare Installation Media
To install Vincent OS, you will need to create a Vincent OS LiveCD, you can refer to the following documentation:
Step 2: Boot from LiveCD
Change Boot Order
Once you have created the LiveCD, insert it into your computer and reboot.
You may need to change the boot order in your BIOS/UEFI settings to boot from the USB Stick first.
Boot from LiveCD
When the system starts, you should see the Vincent OS boot menu. There are two options available:
- Vincent OS Installation: This option will start the installation process directly.
- Vincent OS LiveCD: This option will boot into the LiveCD environment, allowing you to try Vincent OS before installing it.
Installation
You will boot directly into the Vincent OS Installer without entering on the desktop.
You can begin the installation process.
LiveCD
If you saw the login desktop, you have successfully booted into the LiveCD environment!
The default login credentials are as follows:
- Username: user
- Password: VincentOS
You are now logged into the Vincent OS LiveCD environment. From here, you can begin the installation process.
Installation Steps
You are now ready to begin the installation process. Follow the steps below to install Vincent OS on your system:
Step 1: Start the Installer (if your are on LiveCD)
From the desktop environment, go to the start menu and go to the following location:
System -> Install System
Step 2: Follow the Installer Instructions
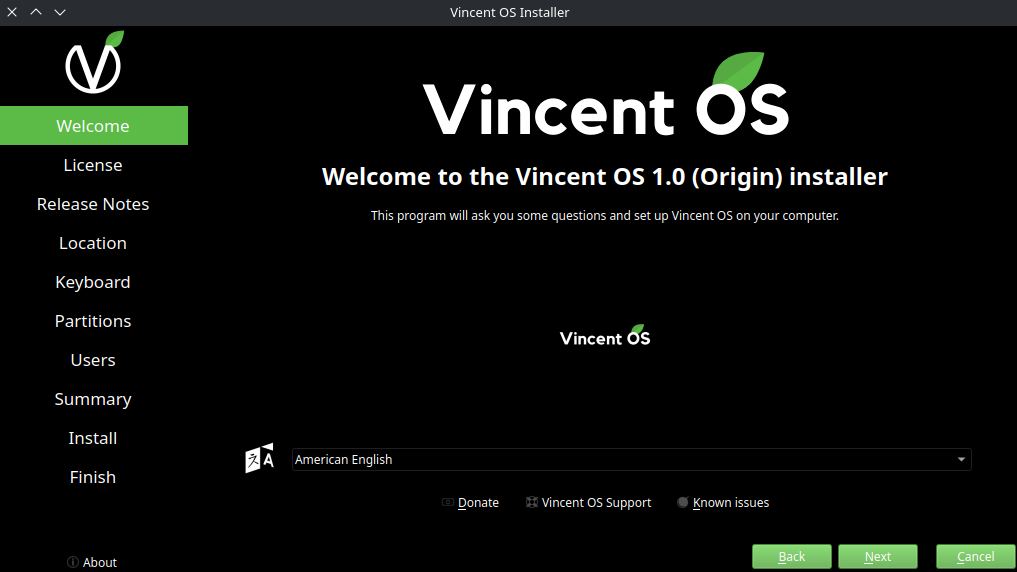
Welcome Screen
This is the welcome screen for the Vincent OS Installer, it will check if your system meets the minimum requirements for the installation.
You can select your language from the dropdown menu and click "Next" to proceed.
License & Release Notes
Before proceeding with the installation, you must accept the following licenses
- Vincent OS European Union Public License (EUPL) 1.2
- Vincent OS GNU General Public License (GPL) 3
- v38armageddon Privacy Policy
After accepting the licenses, you can find the latest Release Notes on the installer, it indicates all the new features and improvements in the new version of Vincent OS.
Location & Keyboard
In this step, you will configure your location and keyboard settings.
Partitions
You will need to choose where Vincent OS will be installed, you may encounter two views depending on your configuration:
- New Installation without any existing partitions or installed Operating Systems
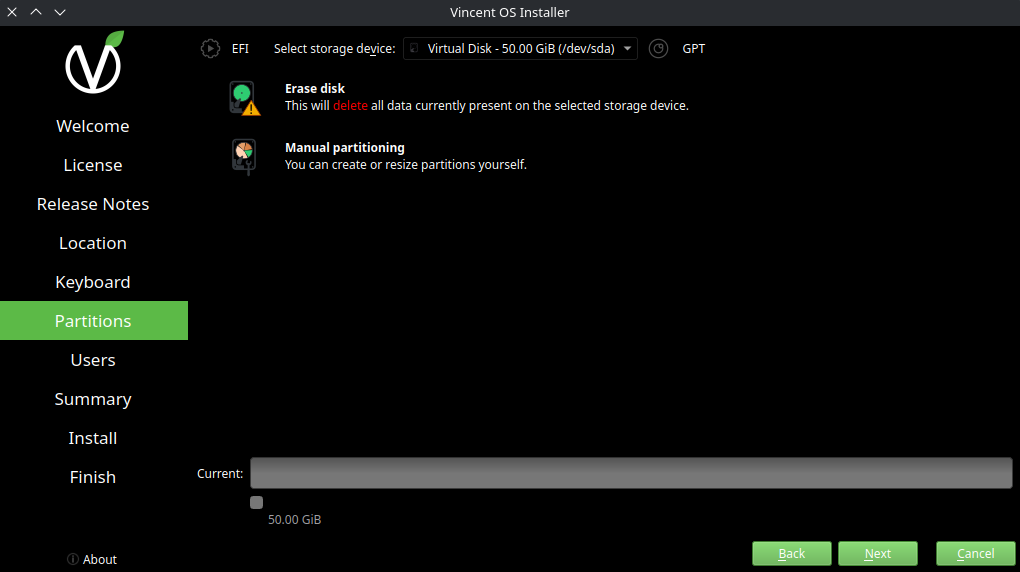
- Existing Installation or other operating systems
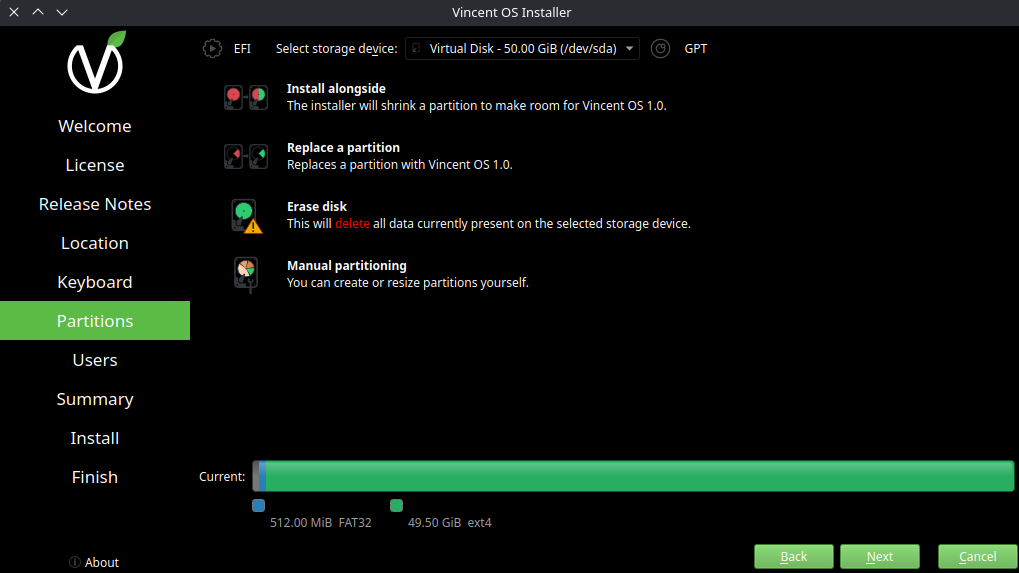
Here is a explanation of the different options:
- [Existing installation only] Install alongside: This option will install Vincent OS alongside with an existing operating system, allowing you to choose which OS to boot at startup.
Be sure to have enough disk space available to have the comfort of using both operating systems without having space issues.
-
[Existing installation only] Replace a partition: This option will replace an existing partition with Vincent OS, erasing all data on the selected partition. This option is useful when you want to quickly reinstall Vincent OS without having to erase all data on the disk.
-
Erase disk: This option will erase the entire disk and install Vincent OS. This is the recommended option for a full clean installation.
-
Manual partitioning: This option is for advanced users who want to create, delete, or modify partitions manually. This gives you full control over the partitioning scheme but requires a good understanding of disk partitioning.
Users
In this step, you will create your user account. You will need to provide the following information:
- Username (must be in lowercase, not containing spaces)
- Full name
- Computer name (generated in the following format:
<username>-<your pc motherboard>-vincentOS) - Password
Summary & Install
This will recapitulate all the choices you made during the installation process. Review the summary carefully and click "Install" to begin the installation of Vincent OS. A message will appear to confirm a last time your installation.
The installation process will begin, and you will see a progress bar indicating the status of the installation. This may take some time.
Finish
Once the installation is complete, you will see a message indicating that Vincent OS has been successfully installed. You can then reboot your system and start using Vincent OS!
You can follow the post-installation tips to help you get started with Vincent OS.
Post Installation Tips
Congratulations! You have successfully installed Vincent OS and are now ready to explore its features! To avoid getting lost in this new operating system, follow these tips.
Desktop Environment
You can see that the desktop environment is different from what you may be used to. Take some time to explore the new layout and features. Here are a few key points to help you navigate:
Top bar
The top bar contains three icons, on the left you will have the date and time click here and you have the calendar.
In the center you have the list of the notifications you have missed and on the right, you have the user menu.
The user menu allows you to switch between different user accounts and access to system shutdown options.
Bottom bar
The bottom bar contains three elements: the start menu on the left, allowing you to access your applications, the taskbar in the center, showing your open applications, and the system tray on the right, displaying quick settings.
Discover (Software Center)
The Discover Software is the software store for Vincent OS, allowing you to easily find, install, and manage installed software.
If you are more of a technical user, you can also use the command line to install software packages with pacman.
Vincent OS is based on Arch, which means you can take advantage of the Arch User Repository (AUR) for additional software packages.
We don't recommend using AUR packages unless you are sure of what you are doing, as they are not officially supported and may cause system instability.
We offer the possibility to install yay on the official Vincent OS Repository, an AUR helper but we are not responsible for any issues that may arise from using AUR packages.
Updates
When you have a fresh install of Vincent OS, some packages may be outdated. To ensure you have the latest software and security updates, it's a good idea to run the following commands:
Update-System.ps1
This script will update your system and install any available updates.
Core LivePatch
Vincent OS includes a unique feature called Core LivePatch, allows you to update critical system components without rebooting your machine.
To get more technical details about how Core LivePatch works and how to use it, please refer to the Core LivePatch documentation.
Core LivePatch
Not to be confused with Kernel Livepatching and kpatch, (see: https://wiki.archlinux.org/title/Kernel_live_patching, https://www.redhat.com/fr/blog/introducing-kpatch-dynamic-kernel-patching)
Definition
Core LivePatch (abbreviated to CLP) allows you to update critical Vincent OS part via patches without rebooting your computer.
An automated systemd service runs on the background to manage the update and apply all patches. It runs all days at 12H00 (24h format).
You can disable this service by running the following command:
systemctl disable core-livepatch-update.timer
Features
Core LivePatch can do the following tasks:
- Applying critical patches: Update key system files, such as configuration files in
/etc, to address urgent issues. - Revert a previous version of a specific package: Roll back a specific package version to resolve critical issues (e.g. Revert a previous version for the following issue: nvidia-black-screen-after-an-update.md).
All patches are distributed in a .clp format, designed specifically for Vincent OS.
If necessary, you can rollback a Core LivePatch update if some file / package break your system.
Developer Informations
Source code of Core LivePatch can be found in the Vincent OS GitHub repository.
Core LivePatch is made in C# and use the latest .NET LTS version. It is dependent on the following packages:
dotnet-runtime-X.Y(where X.Y is the latest .NET LTS version, e.g., 8.0)powershell-bin(see Scripts part)
Structure of a .clp file
A .clp file is a zip compressed archive. Minimum required files:
CLPRYYMMDD.clp
├── PKGINFO.meta        # XML metadata (name, description, etc.)
├── Install-Script.ps1  # PowerShell script executed to apply the patch
└── Remove-Script.ps1   # PowerShell script executed to rollback the patch
Scripts
Install-Script.ps1
This PowerShell script is executed when applying the patch. It should contain all necessary commands to update the system.
Example:
#!/usr/bin/pwsh
# Patch Creator: Your Name
# Date: XXXX-XX-XX

$patchFiles=(
	# Define your files here
	"tmp/example-patch/new-file.txt",
	"tmp/example-patch/modified-file.txt",
	"tmp/example-patch/removed-file.txt"
)
$ogPatchDir="/opt/CLP/$(Split-Path -Leaf (Get-Location))"
$backupDir="${ogPatchDir}/backup"

Start-Transcript -Path "/var/log/CLP.log" -Append

# Because we are never sure if the system is stable, we create a backup
# of the files we are going to modify.
function Confirm-BackupDirectory {
	mkdir $backupDir
	Write-Host "[INFO] Backup directory created at $backupDir"
}

function Backup-File {
	param (
		[string]$file
	)

	if (Test-Path -Path $file) {
		Copy-Item -Path $file -Destination $backupDir
		Write-Host "[INFO] Successfully backed up: $file"
	}
	else {
		Write-Warning "[WARNING] File: $file not found. Skipping backup."
	}
}

function Restore-Action {
	$revertScript = Join-Path -Path (Get-Location) -ChildPath "Remove-Patch.ps1"
	if (Test-Path -Path $revertScript) {
		Write-Host "[INFO] Reverting changes..."
		& $revertScript
	}
	else {
		Write-Error "[ERROR] Remove-Patch.ps1 is missing or not executable. Aborting."
		exit 2
	}
}

function Install-Patch {
	Confirm-BackupDirectory
	foreach ($file in $patchFiles) {
		Backup-File -File $file
		switch ($file) {
			"tmp/example-patch/new-file.txt" {
				Write-Host "[INFO] Installing new file: $file"
				Copy-Item -Path $file -Destination "/opt/CLP/new-file.txt"
			}
			"tmp/example-patch/modified-file.txt" {
				Write-Host "[INFO] Modifying file: $file"
				Copy-Item -Path $file -Destination "/opt/CLP/modified-file.txt" -Force
			}
			"tmp/example-patch/removed-file.txt" {
				Write-Host "[INFO] Removing file: $file"
				Remove-Item -Path "/opt/CLP/removed-file.txt" -Force
			}
			default {
				Write-Error "[FATAL] An unknown error occurred while applying the patch."
				Write-Error "[FATAL] Reverting all changes."
				./Remove-Patch.ps1
			}
		}
	}
	Write-Host "[INFO] All files installed successfully. Processed files:"
	foreach ($file in $patchFiles) {
		Write-Host "  - $file"
	}
	Stop-Transcript
	exit 0
}

Install-Patch
Remove-Script.ps1
This PowerShell script is executed when rolling back the patch. It should contain all necessary commands to revert the changes made by the Install-Script.ps1.
Example:
#!/usr/bin/pwsh
# Patch Creator: Your Name
# Date: XXXX-XX-XX

$patchFiles=@(
	# Define your files here
	"tmp/example-patch/new-file.txt"
	"tmp/example-patch/modified-file.txt"
	"tmp/example-patch/removed-file.txt"
)
$ogPatchDir="/opt/CLP/$(Split-Path -Leaf (Get-Location))"
$backupDir="${ogPatchDir}/backup"

Start-Transcript -Path "/var/log/CLP.log" -Append

foreach ($file in $patchFiles) {
	$backupFile = Join-Path -Path $backupDir -ChildPath (Split-Path -Leaf $file)
	if (Test-Path $backupFile) {
		Write-Host "[INFO] Restoring file: $backupFile"
		Copy-Item -Path -Verbose $backupFile -Destination $file
	}
	else {
		Write-Warning "[WARNING] Backup file not found: $backupFile"
	}
}
Write-Host "[INFO] All files restored successfully."

Stop-Transcript
Before Troubleshooting
When you encounter issues with Vincent OS, we recommend to check if there is a already a solution available in our different resources:
Searching also for keywords related on your issue might help you find a solution faster.
Vincent OS is based on Arch Linux, so most solutions for Arch Linux will also work for Vincent OS.
When asking for help, you can generate a log file. To do so, run the following command in a terminal:
Start-Transcript -Path your_log_file.log
Then, reproduce the issue you are facing. Once done, stop the logging by running:
Stop-Transcript
This will create a log file that you can share when asking for help.
NVIDIA: Black screen after an update
In case of a NVIDIA driver update and after reboot, you only see a black screen, follow this guide to how downgrade the NVIDIA driver.
- Open a Terminal
- Go to
/var/cache/pacman/pkgby typing the following command:
PS> Set-Location /var/cache/pacman/pkg
- Now, lookup the correct package to downgrade, there are 3 to view:
- nvidia-dkms
- nvidia-utils
- nvidia-settings
You can search the version to downgrade by going on the following websites:
- Now that you located the version, type the following command:
# pacman -U nvidia-dkms.123-4 nvidia-utils.123-4 nvidia-settings.123-4
- Reboot the system when finished.
Congratulation you downgraded the NVIDIA Drivers!
SysRq Method
SysRq call directly in the kernel and therefore, you must not use this combination other than to solve system unresponsive problems.
With a little mistake manipulation, you can loose all your unsaved work!
If your system become unresponcive, you can use SysRq to perform kernel level actions to troubleshoot your system.
Activation
You can verify if SysRq is activated by opening a terminal and enter this command:
Get-Content /proc/sys/kernel/sysrq
If there is other values returned than 1, enable the SysRq via the command:
sysctl kernel.sysrq=1
REISUB Method
REISUB Method is a memotecnical way to troubleshoot the Operating System in case of a unresponcive system.
You can reboot your system using the REISUB Method, here's how to do it:
| Keyboard Shortcut | Description |
|---|---|
| Alt+SysRq+R | Switch keyboard mode from RAW mode to XLATE mode. |
| Alt+SysRq+E | Send SIGTERM to all processes (except init). |
| Alt+SysRq+I | Send SIGKILL to all processes. |
| Alt+SysRq+S | Sync all data to disk. |
| Alt+SysRq+U | Unmount and remount all filesystems to read-only. |
| Alt+SysRq+B | Reboot. |
More informations can be found on ArchLinux wiki and Wikipedia:
Updating with pacman failed due to keyring issues
When updating your system with pacman, if you encounter the following error related to keyring issues:
error: <repo>: signature from "<key>" is invalid
error: failed to synchronize all databases (unexpected error)
This indicates that the repository signature cannot be verified due to missing or untrusted keys in your keyring. To resolve this issue, you can download the CLP125112 and execute it:
clpctl install CLP1251124.clp
This will install the missing keys and allow you to update your system without further keyring issues.
Manual method
If you prefer to manually update the keyring, you can follow these steps:
- Add the missing keys: Identify the missing keys from the error message and add them to your keyring using the following command:
pacman-key --recv-keys <key> - Sign the keys: After adding the keys, sign them to mark them as trusted:
pacman-key --lsign-key <key> - Update the keyring package: Ensure that your keyring package is up to-date:
pacman-key --refresh-keys
You should now be able to update your system without encountering keyring issues.

WebSM
Welcome to WebSM! WebSM is a minimalist, simple web browser that has to goal to not be complicated and be accessible to everyone.
This documentation explains how WebSM works.
WebSM Versions
WebSM
Windows
You can download the latest version of WebSM using the Microsoft Store to benefit from automatic updates.
If you prefer to download the Desktop version only, you can get it from the latest release on GitHub.
Linux
Vincent OS
WebSM is included in the Vincent OS repositories. You can install it using the following command:
pacman -S websm
Other distributions
You can download the Flatpak version of WebSM from or official Flatpak repository.
flatpak remote-add --if-not-exists v38armageddon https://repo.v38armageddon.net/flatpak/v38armageddon.flatpakrepo
Then, you can install WebSM using the following command:
flatpak install net.v38armageddon.WebSM
Android (Experimental)
While we want to push support on mobile devices, stability is not yet guaranteed. You can download the APK from the latest release on GitHub.
If you encounter any issues, please report them on our GitHub Issues page.
Functionality
- Microsoft WebView2: WebSM is based on Microsoft WebView2 which is based on Microsoft Edge.
- Minimalist: WebSM is designed to be minimalist and simple for the users, only the basic search here, no more no less.
- Sidebar: A Sidebar for quick search or even, listening to music.
WebSM Lite
Windows
WebSM Lite on Windows is a very minimalist version of the WebSM project, specifically designed to optimize performance on low-end devices while retaining the same core structure.
If you prefer to download the Desktop version only, you can get it from the latest release on GitHub.
Linux
Vincent OS
WebSM Lite is included in the Vincent OS repositories. You can install it using the following command:
pacman -S websm-lite
Other distributions
You can download the Flatpak version of WebSM Lite from or official Flatpak repository.
flatpak remote-add --if-not-exists v38armageddon https://repo.v38armageddon.net/flatpak/v38armageddon.flatpakrepo
Then, you can install WebSM Lite using the following command:
flatpak install net.v38armageddon.WebSM.Lite
Android (Experimental)
While we want to push support on mobile devices, stability is not yet guaranteed. You can download the APK from the latest release on GitHub.
If you encounter any issues, please report them on our GitHub Issues page.
Functionality
- Microsoft WebView2: WebSM Lite is based on Microsoft WebView2 which is based on Microsoft Edge.
- Low computer friendly: WebSM Lite keeps only the essential features for navigating the web, making it suitable for low-end devices.
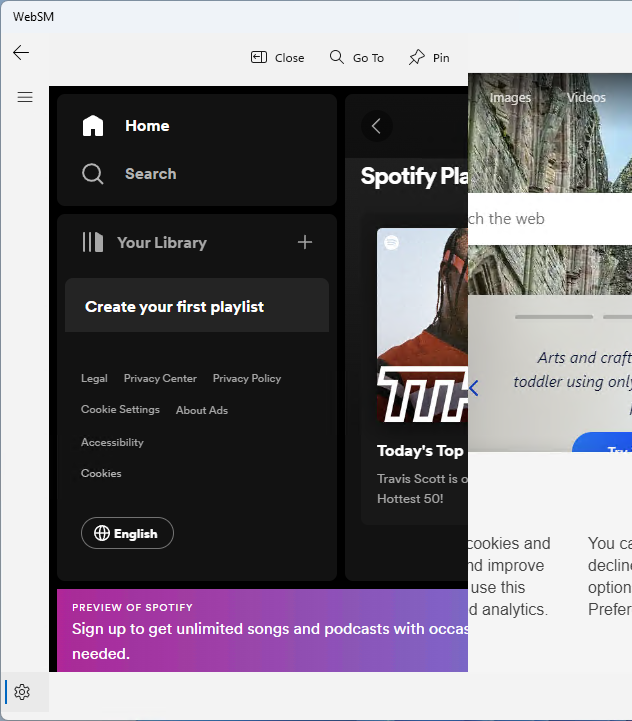
Sidebar
The sidebar is a little navigator, it is used essentially for executing websites that can be played on background (eg: Spotify).
You can also use this bar doing a quick search without opening another tabs.
Before Troubleshooting
When you encounter issues with WebSM, we recommend to check if there is a already a solution available in our different resources:
Searching also for keywords related on your issue might help you find a solution faster.
When asking for help, you can generate a log file. To do so, run the following command in a terminal:
Start-Transcript -Path your_log_file.log
Then, reproduce the issue you are facing by launching WebSM from the terminal. Once done, stop the logging by running:
Stop-Transcript
This will create a log file that you can share when asking for help.
[Vincent OS | Linux] WebSM does not start
This issue can happen if you are using a Wayland session, WebSM is build with Uno Platformn, which currently, have issues supporting Wayland sessions due to WebView2 limitations.
The Flatpak version of WebSM is configured to use the X11 backend, so using the Flatpak version of WebSM can be a workaround for this issue.
To launch WebSM on X11 backend, add the following environment variable:
GDK_BACKEND=x11 websm
# Or if you are using the Lite version
GDK_BACKEND=x11 websm-lite
This will force WebSM to use the X11 backend, and should allow it to start correctly.

MediaBrowser
Here you can find several informations about MediaBrowser.
Theses informations can be used for tutorial or even knowing the functionality of the software.
Tasks
| Title | Description |
|---|---|
| Exit | Exit the software |
| About | Give information about MediaBrowser |
Pictures
| Title | Description |
|---|---|
| My Pictures | Allow to show pictures from your local files (Windows / Xbox) and network files (Windows only) |
| Camera | Allow to show your camera |
Music
| Title | Description |
|---|---|
| My Music | Allow to listen to musics from your local files (Windows / Xbox) and network files (Windows only) |
Videos
| Title | Description |
|---|---|
| My Videos | Allow to watch your videos from your local files (Windows / Xbox) and network files (Windows only) |
Extras
| Title | Description |
|---|---|
| Bing Maps | Allow to watch a map of the world |
Controls for Xbox users
| Control | Description |
|---|---|
| A | Enter to Bing Map |
| B | Exit the Bing Map |
| LT | Zoom |
| RT | Unzoom |
| Left Stick | Move the map |